Happy Sunday Everyone!!!!
Welcome to Sassy Studio Sunday!...Today I have a fun tutorial for holiday ornaments..this will be perfect for tree..
Lets start with the supplies....
Double sided Patterned Paper, scrap cardstock, nestabilities or any circle cutters, Ribbon, Scor-tape or sticky strips, blings, Bells(optional).
First color in your image and cut it out with circle cutter or nesties.. also cut a matching scallop circle..
Adhere the image circle to the scalloped circle....
then cut your patterned paper into 12--- 2 1/2" squares.... Add scor-tape to one side of the each square like this
fold the pieces into a cone shape and adhere the ends...Make sure to fold it in same direction so that you have the same pattern outside...
then cut a 3" circle out of the scrap cardstock, draw a line thru the center of the circle... adhere scor-tape on it..
Now the fun begins...adhere the cones to the base circle so the they meet at the center point of the circle like this..
Continue adding one cone at a time ....
Repeat the step to cover the entire base circle...
Now you have the base of your beautiful ornament... double-sided paper makes it easy and pretty...
Adhere the image to the center .....
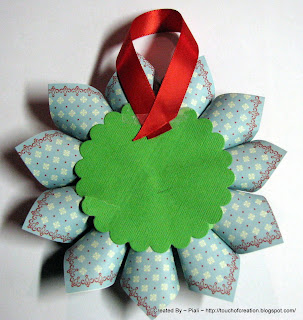
turn it around and adhere the ribbon to form a hanger....
And cover it up with a matching circle to finish ( I used a scallop circle for the base)...
You can add bling/gems on the each cone....for added sparkle. Now you can embellish your ornament as you like it...
I tied two bells on both ends of a piece ribbon and adhere it to the bottom of the ornament .....
Now you have a beautiful ornament for your tree..you can make it with images, photos or monograms...
hang it for everyone to enjoy...
Hope you all like this tutorial .
If you try out my tutorial this week and send pictures and a link to..
... you will receive a gift, any dollar image of your choice!!!
You have until Saturday, December 5th to submit your creations!
hugs
Piali.


this is fantastic,
ReplyDeletethank you for the tutorial,
Hugs
Angie
Thanks so much for the tutorial! I had to tweak here and there because I think I used to thick of a cardstock, and I made my center image a little too large..ack! But overall I think it turned out cute. I'll be sending it to you shortly...a few things need to dry first!
ReplyDeleteHave a great day!
OH MY!! I LOVE THIS!! I can't wait to give it a try today!! Thanks for such well thought out and written tutorials Piali!! I appreciate the time you spend doing this!! Blessings and Hugs!
ReplyDeleteaww, reminded me of those ornaments we used to make with my mom...Super cute!
ReplyDeleteThis comment has been removed by the author.
ReplyDeleteWOW!
ReplyDeleteThis is great!!
Fantastic!
You make it so clear & simple for peeps like me to follow.. :}
Happy Holidays P!
Wow, Piali! This is awesome! I love your ornament girly!
ReplyDeleteHugs,
Lelia