Sunday, November 29, 2009

Studio Sunday #8


Happy Sunday Everyone!!!!
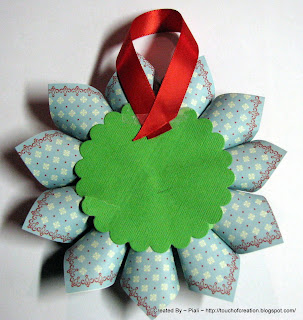
Welcome to Sassy Studio Sunday!...Today I have a fun tutorial for holiday ornaments..this will be perfect for tree..
Lets start with the supplies....


Double sided Patterned Paper, scrap cardstock, nestabilities or any circle cutters, Ribbon, Scor-tape or sticky strips, blings, Bells(optional).

First color in your image and cut it out with circle cutter or nesties.. also cut a matching scallop circle..


Adhere the image circle to the scalloped circle....
then cut your patterned paper into 12--- 2 1/2" squares.... Add scor-tape to one side of the each square like this

fold the pieces into a cone shape and adhere the ends...Make sure to fold it in same direction so that you have the same pattern outside...


then cut a 3" circle out of the scrap cardstock, draw a line thru the center of the circle... adhere scor-tape on it..


Now the fun begins...adhere the cones to the base circle so the they meet at the center point of the circle like this..

Continue adding one cone at a time ....


Repeat the step to cover the entire base circle...


Now you have the base of your beautiful ornament... double-sided  paper makes it easy and pretty...


Adhere the image to the center .....


turn it around and adhere the ribbon to form a hanger....


And cover it up with a matching circle to finish ( I used a scallop circle for the base)...
You can add bling/gems on the each cone....for added sparkle. Now you can embellish your ornament as you like it...
I tied two bells on both ends of a piece ribbon and adhere it to the bottom of the ornament .....


Now you have a beautiful ornament for your tree..you can make it with images, photos or monograms...
hang it for everyone to enjoy...


Hope you all like this tutorial .
If you try out my tutorial this week and send pictures and a link to..
... you will receive a gift, any dollar image of your choice!!!
You have until Saturday, December 5th to submit your creations!
hugs
Piali.


Saturday, November 28, 2009

Studio Sunday Cont.

Oh my goodness aren't Piali's tutorials always awesome!!! She also did a fabulous Shaker ornament last week on her blog as well...
I loved her shaker ornament so much I asked her to do an ornament tutorial and I said I would do some ornament samples too.... but I think mine are way simple and plain compared to Piali's awesome ornaments , but none the less they will be adorning my tree this year because they are cute.
Mine I used the ornament template.
I printed the card base on the back of a sheet of glitter CS
across the top of the fold I created a slit to slide my ribbon through.
I taped both raw ends of the ribbon to the inside of the card and then glued both sides together creating one solid double sided ornament and then decorated them.


And I dont know if you remember these 2 creations or not these were done a little while back. This first one was by Sara, and she used the ornament template as well and she just punched her ribbon through the top.

and this one was by cassie, though hers wasnt designed as an ornament it was done beautifully and can easily be made into an ornament.

So thank you sooooo much Piali for the wonderful tutorial your creations are always so amazing!

and though mine are simple I hope they inspire you all to adorn your trees and give gifts of home made ornaments! and I hope you do! so as always if you participate and create some ornaments of your own inspired by this weeks tutorial you can earn a free dollar image of your choice or a surprise new never released one! so please play along and send a pic of your ornaments to sassystudiodesigns@yahoo.com

Lindsay

Hey there Sassy Sistahs!! How are you? How was your holiday, if you celebrated? Hope youhad LOTS of quality time, with your loved ones!! SO glad you stopped by!! I have TWO fabulous creations for you today!! The FIRST is from JENNY, of Playing is a Passion!! JENNY used our Princess Penelope Digi!! I just LOVE her coloring!! Don't you? The second creation is from, kellystooks, on Splitcoast! I tried to track down more info on her, but, was not able to! So, kellystooks, if you want to send me your info, I can add it here!! She created a beauty with, Giving Thanks! Don't you think?! Ok, ladies......be sure to drop me an email at sassy.saturdays@yahoo.com and I will get you your badges!!

**JENNY!

**KELLYSTOOKS!

Now, you know that I LOVE to share!! So....what are you waiting for, get me those SASSY creations!! You never know when yours, will be showcased here!! Besides What cool badges, right? Who wouldn't want one of those!!! OK, so here's what you need to do! Create something, using SASSY STUDIOS images, and upload it to PCP and/or SCS. What are they, you might ask? They are Paper Craft Planet and Splitcoaststampers!!! You do know, that we have our own album now, over at Splitcoast??!! YEPPER, we sure do!! When you upload your creations? You will want to label them sassystudio, so we can find them!! Got it? Remember,......... Not ONLY will you be featured here? BUT? You will also be able to grab that SASSY SATURDAY badge I was talking about, for you to display on YOUR blog!! How SWEET is that? If you are NOT able to upload your pic? NO worries!! Just submit your creations to me, at sassy.saturdays@yahoo.com.
Well, that's it for me today!! We have another family gathering to get to!! Stay tuned tomorrow, for Studio Sunday!! Hope you have an AWESOME Saturday and have FUN shopping!! I am sure there are LOTS of GREAT deals out there yet!! See you here next week!! Until then........keep it SASSY!!!


ENJOY LIFE!
Jacquie/Javablustamper!

Thursday, November 26, 2009

in case anyone is having trouble with getting the higher resolution freebie here it is lets hope this one works out better double click 1st


Happy Thanksgiving & Sassy Thursday!


First all we all here at Sassy Studio's would like to wish everyone a Blessed & Happy Thanksgiving day!

This week for Sassy Studio Thursday we have a recipe challenge...the recipe is using...
3 decorative papers, 1 decorative edge and brads with your SSD image. So show us what you got! Here is what we got to inspire you with using this challenge on our cards.


and yes that is a sneak peak at a new image!!


and yes this is another sneak peak of what is to come on the 1st!

If you would like to play along post the card with this challenge...You will have until next Wednesday 12/2, at midnight PST, to get your entry in! Make sure to use a SASSY STUDIO image and link your creation HERE, in the comments section of this post!! A winner will be announced on Friday 12/4!! The winner will receive their choice of 2 SSD images!!

Wednesday, November 25, 2009

Bonus Challenge!

HAPPY Day Before Thanksgiving!!!


Soooo.... What is this?!?! a Bunus Challenge?!?! Yep... Well I dont know if any of you have noticed I am a huge Disney Fan!!! I try not to make my stuff look like disney copyright issues and all but i do use disney characters and films as inspiration at times.... SO I was soooooo excited that today was the release date for The Princess and the Frog!!! that I wanted to do a bonus challenge in celebration!! he hee (ok then I found out that it is a limited release only a few theaters in LA and NYC have it uggghh imagine my disapointment!!!)


So the Challenge will begin today and go through Dec 11th (the full release date it will be in all theaters!!!) your entries must be in no later than midnight pst dec 11th
What is the challenge?!?! make a card or prooject inspired by the film. It can be new orleans inspired, frog inspired princessy etc let your imagination go wild!!!, the only requirement is you must use a SSD image somewhere in your creation. You can find preview clips all over the internet if you havent seen them already and I posted the movie poster for you to see...here are some samples by the DT


Jacquie


Valerie


Cassie


Sara


now since this is a bonus challenge I thought we needed an extra special prize...and maybe a freebie too!!!

So lets start with the freebie...you may recognize our frog prince but he needed a princess for this challenge lol...you do not by any means have to use this image for the challenge but you must use an SSD image...any SSD image so be creative!

for teh freebie be sure to double click to get higher quality version of the image

Image was removed now available in the store

and lastly the prize!!!
One winner will be selected, and that winner will get a special prize package including
Princess Penelope, Masquerade, Princess and the Frog, The Frog Prince, True Loves Kiss, Fairytale Sentiments and 3 other SSD images of their choice!!! What a prize that is!!!

Sunday, November 22, 2009

Studio Sunday #7


Good Morning Everyone!!!
Its my turn today to host another Studio Sunday...as the holiday season is around the corner today I have quick tutorial for a very easy gift ..under $5 .
Its a mini desk Calender..good for anyone..teachers,co-workers....

So lets start with the supplies needed..

An Acrylic 5"x 7" photo frame ( you can get it at Walmart, Michaels...for $2) ,a 5"X7" piece of double sided Designer paper, calender printout, some scraps ,mini post-it,adhesive and two Sassy Images...
I planned to use some other images..but when Lindsay showed me the new release images ...Bam! I just picked this fabulous one ...and my all-time fave Sweet Soda Pop Penny.
You can find the free printable Calender here....http://www.printable2010calendar.net/.

Now ..color your images using any coloring medium..and adhere them to scrap pieces of cardstock...then adhere the matted image to 5"x7" piece of DP...pick any side you want..I picked the right-side..


also do the same for the reverse side too...


Now slide the decorated piece of the DP into the photo frame like this...


Trim the calender printout stack them up month-wise and adhere it to a scrap piece of cardstock.
Then adhere the post-it pad and the calender to the top of the photo frame..


You are almost done with it...just add a pen..then you will have a reversible desk calender..


Easy,quick and very useful gift is ready for giving....
Hope you all like this tutorial .
If you try out my tutorial this week and send pictures and a link to..
... you will receive a gift, any dollar image of your choice!!!
You have until Saturday, November 29th to submit your creations!
hugs
Piali.


Saturday, November 21, 2009

Studio Sunday #8

So as I explained earlier this week....I blew it! lol I completely forgot to do my post for studio sunday last weekend...so today is double the fun!
Piali's tutorial is awesome! what a great gift idea especially for coworkers in your office or even you childs teacher(s).
My tutorial is a spin off the last one I did. Last time I showed some ideas how to throw together a few last minute touches around your house to decorate for halloween...well this time we have Thanksgiving this week! I am sooooo excited! I have to be super good on my weight watchers points all week because I know I am gonna be digging into my weekly allowance on thursday!!! he hee
But as I explained before I really like personalizing things and giving them a little something special especially when I have friends or family over.
So last time I showed you how easy it was to do invitations from the poisoned apple template, and place cards by shrinking the pumpkin template.... well we also did a wonderful turkey card template, which I shrunk down and turned into place cards as well. I am going to alternate them on the table with the pumpkins. All I did was color them and assemble them the same way as before.
Also we will have a few children at Thanksgiving and I dont know how your kids are, but my Cousins like to munch before hand always asking when's it gonna be ready... SO I used the small pillow boxed and the pumpkin card templates and made cute little favor boxes with their names on it . and filled it with reeses pieces but you can use any candy you like of course!

Next up I did 2 different napkin rings. the 1st i just folded the napkin into a rectangle and made a slider style napkin ring. I used chocolate brown card stock fo rthe base and layers different fall ribbons, and embelished the top with a scallop circle of green and a cute thanksgiving sentiment. (this was a dollar stamp set I had)
This was a great way to do it because the silverware slides right in and it makes for an easy table setting instead of trying to remember where the forks go and the knife and the spoon etc
Next up I did a ring shape with my paper and ribbons and created a simple slide in napkin ring (no fancy folding needed!)

i started with chocolate brown card stock and added a green scalloped trim at the botton and covered the seam with orange ribbon, I used a scalloped circle punch and a plain circle punch and the same dollar stamp set for the sentiment. I just cut to 6" long and used a heavy duty adhesive at the back to attach the end and then just slid the napkin right in
I know I didnt use SSD images, but I did use templates and a lot of times when you are doing these things last minutes you want to just cut and piece and not have to color a ton of images.

So as always if you decide to take our tutorials and put them into practice this week you can get a free dollar deal image from SSD.... now I have been asked does it have to have an SSD image in it..... well yes and no....I would really love it if you do use an SSD image however say for napkin rings I didn't use anything SSD, and if you dont either it's fine I am just more than happy that you are willing to try some of these great tutorials we are doing and I want you to show off what you did and where you got the idea at and that is more important that nit picking if you dont use an SSD image...soooo I cant wait to see if any of you do up your thanksgiving day table or home with any projects inspired by us, and hope you will share pictures with us if you do!

So have a Sassy Sunday all!
Lindsay
HAPPY Saturday my SASSY Sistahs!!! How are you? Here we are again!! AND? Wait until you see what I have for you today!! I SO enjoy browsing the galleries and perusing the blogs!!! You all are SO talented!! Speaking of which, make sure to check out the SASSY DT CALL below!!
OK,......on with the show!! Haha! Todays creations are brought to you by, MANDY! You can visit her HERE!! You are going to want to do that, believe me!!! She has some SASSY talent to share!! For sure!!! I was SUPER excited when I visited her, she had SEVERAL sassy creations to share!! Thanks Mandy and make sure to shoot me an email at sassy.saturdays@yahoo.com!! I will get your badges our to you!!


**Mandy's creation with, Baby it's Cold Outside!


**Mandy's Mrs. Claus creation!

**A Happy Thanksgiving creation, by Mandy!Now...you know you want a SASSY badge for yourself....right? Well? Don't you? Alrighty then, here's what you need to do! Create something, using SASSY STUDIOS images, and upload it to PCP and/or SCS. What are they, you might ask? They are Paper Craft Planet and Splitcoaststampers!!! You do know, that we have our own album now, over at Splitcoast??!! YEPPER, we sure do!! When you upload your creations? You will want to label them sassystudio, so we can find them!! Got it? Remember,......... Not ONLY will you be featured here? BUT? You will also be able to grab that SASSY SATURDAY badge I was talking about, for you to display on YOUR blog!! How SWEET is that? If you are NOT able to upload your pic? NO worries!! Just submit your creations to me, at sassy.saturdays@yahoo.com. Hey......you're still here? What are you waiting for? Get creating!!! I can't wait to see what you come up with!! It was SO awesome to visit with you again, this Saturday!! Thanks SO much for stopping by! Can't wait 'till next week, so we can share again!! Have a FABULOUS week!!


ENJOY LIFE!
Jacquie/Javablustamper!